
Hey there! You probably found your way here from my YouTube tutorial – so welcome!
In this post you’ll find all the measurements and written instructions for making my jungle-themed Fancy Slimline Bridge Fold Card. It’s sized perfectly to fit inside a DL envelope (this measures 9 1/2″ x 4 1/8″).
All the measurements
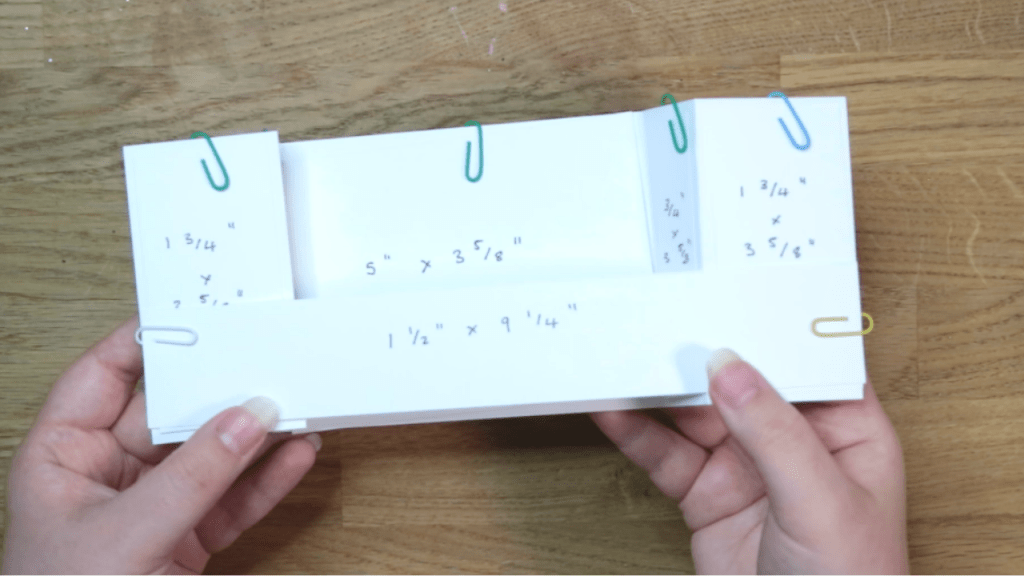
Envelope size: 9 1/2″ x 4 1/8″
Finished card size: 9 1/4″ x 3 7/8″
Card base: Cut to 11 1/4″ x 3 7/8″ – score at 2″, and again 3″ from both ends (you will have 4 fold lines)
Outer panel pieces: 1 3/4″ x 3 5/8″
Inner panel pieces: 3/4″ x 3 5/8″
Centre panel piece: 5″ x 3 5/8″

Step by step instructions
- Cut and score your card base as directed. Fold the two outermost panels towards the back of the card, then fold the opposite way at the inner score lines. Your card should now stand up on its side.
- Cut the decorative panels following the measurements above. Adhere these to the appropriate panels on the front of your card base.
- Die cut plenty of leaves – these will form the main part of your ‘bridge’. Blend ink onto the edges for dimension.
- Stamp, colour and cut out your critters for the front of the card.
- Assemble the bridge by attaching the critters together, then adhering all the leaves to the back. Make sure this is wide enough to hold the two sides of your card together when stuck down. Add additional cardstock pieces to the back for stability.
- Stamp and cut out your sentiment label, then attach to the front of your bridge piece with foam tape.
- Using liquid glue, attach each side of the bridge to the outermost panels, being careful not to get glue on the inside of the card. When attaching the second side, fold the card flat to ensure you adhere it in the correct place.

Supply list
- Clearly Besotted Petite Plushies Stamp Set – https://www.clearlybesottedstamps.com/products/petite-plushies
- Clearly Besotted Mini Calligraphy Stamp Set – https://www.clearlybesottedstamps.com/products/mini-calligraphy
- Tonic Studios Kraft Cardstock – https://www.tonic-studios.co.uk/collections/all/products/brown-kraft-card
- The Works Paper Pad [No Longer Available]
- AliExpress Tropical Leaf Dies [No Longer Available]
- Memento Rich Cocoa Ink – https://amzn.to/3je1yqu
- Distress Ink in Gathered Twigs – https://amzn.to/35Tg6UD

